我们研发开源了一款基于 Git 进行技术实战教程写作的工具,我们图雀社区的所有教程都是用这款工具写作而成,欢迎 Star 哦
如果你想快速了解如何使用,欢迎阅读我们的 教程文档哦
在上一篇教程中,我们用熟悉的 React 和 Hooks 搞定了“奥特曼俱乐部”的雏形。在这一篇文章中,我们将用 Taro 自带的路由功能实现多页面跳转,并用 Taro UI 组件库升级之前略显简陋的界面。这一篇完成后的 DEMO 如下:
具体有三个页面:
- 主页:展示了所有帖子,以及添加新帖子的按钮。
- 帖子详情:展示单个帖子的全部内容。
- 个人主页:展示当前用户的个人信息。
如果你想直接从这一篇开始动手实践,那么请运行以下命令快速开始:
git clone -b second-part https://github.com/tuture-dev/ultra-club.git
cd ultra-club
本文所涉及的源代码都放在了 Github 上,如果您觉得我们写得还不错,希望您能给❤️这篇文章点赞+Github仓库加星❤️哦~
来一打页面
在这一步中,我们将开始实现项目的其他页面,包括:
- 帖子详情
post:进入单篇帖子的详情页面 - 我的
mine:显示当前用户的个人信息(在后面的步骤中将实现登录注册哦)
其中,帖子详情页面中将复用前面编写的 PostCard 组件。为了方便管理,我们需要引入一个新的 prop(isList),用于判断此组件是显示在首页列表中,还是在帖子详情页面中。
提示
项目中所需用到的图片可以从这个链接下载,下载后解压并将所有图片放到
src/images目录下。
Taro 的路由功能
路由功能是实现多页面应用的核心,幸运的是 Taro 已经自带了。具体而言,在 Taro 中实现页面跳转只需两个步骤:
- 在入口文件(
src/app.jsx)中在App组件的config中配置之前提到的pages属性 - 在任意组件中通过
Taro.navigateTo或Taro.redirectTo即可实现页面的跳转或重定向
感觉不够直观?OK,我们直接撸起袖子写起来。
配置全部页面
首先在入口文件 src/app.jsx 中配置好所有页面:
import Taro, { Component } from '@tarojs/taro'
import Index from './pages/index'

import './app.scss'

// 如果需要在 h5 环境中开启 React Devtools
// 取消以下注释:
// if (process.env.NODE_ENV !== 'production' && process.env.TARO_ENV === 'h5')  {
//   require('nerv-devtools')
// }

class App extends Component {
  config = {
    pages: ['pages/index/index', 'pages/mine/mine', 'pages/post/post'],
    window: {
      backgroundTextStyle: 'light',
      navigationBarBackgroundColor: '#fff',
      navigationBarTitleText: 'WeChat',
      navigationBarTextStyle: 'black',
    },
    tabBar: {
      list: [
        {
          pagePath: 'pages/index/index',
          text: '首页',
          iconPath: './images/home.png',
          selectedIconPath: './images/homeSelected.png',
        },
        {
          pagePath: 'pages/mine/mine',
          text: '我的',
          iconPath: './images/mine.png',
          selectedIconPath: './images/mineSelected.png',
        },
      ],
    },
  }

  // 在 App 类中的 render() 函数没有实际作用
  // 请勿修改此函数
  render() {
    return <Index />
  }
}

Taro.render(<App />, document.getElementById('app'))
注意到我们还在 config 中注册了导航栏 tabBar,用来在底部切换 index 页面和 mine 页面。
在 PostCard 中添加跳转逻辑
我们首先在 PostCard 组件中添加跳转逻辑,使得它被点击后将进入该帖子的详情页面。将 src/components/PostCard/index.jsx 按如下代码进行修改:
import Taro from '@tarojs/taro'
import { View } from '@tarojs/components'

import './index.scss'

export default function PostCard(props) {
  const handleClick = () => {
    // 如果是列表,那么就响应点击事件,跳转到帖子详情
    if (props.isList) {
      const { title, content } = this.props
      Taro.navigateTo({
        url: `/pages/post/post?title=${title}&content=${content}`,
      })
    }
  }

  return (
    <View className="postcard" onClick={handleClick}>
      <View className="post-title">{props.title}</View>
      <View className="post-content">{props.content}</View>
    </View>
  )
}
可以看到,我们在 PostCard 中注册了 handleClick 用于响应点击事件。在 handleClick 函数中,我们通过新引入的 isList 属性判断这个组件是否展示在首页列表中。如果是的话,就通过 Taro.navigateTo 进行跳转。
提示
眼尖的你一定发现了我们在调用
navigateTo时还加上了查询字符串用于传递参数。在接下来实现帖子详情页面时,我们就可以接收到传递进来的title和content的值啦。
接着我们需要在首页模块中给 PostCard 组件加上 isList。修改 src/pages/index/index.jsx,代码如下:
// import 语句 ...

export default function Index() {
  // 定义状态和 handleSubmit 函数 ...

  return (
    <View className="index">
      {posts.map((post, index) => (
        <PostCard
          key={index}
          title={post.title}
          content={post.content}
          isList
        />
      ))}
      <PostForm
        formTitle={formTitle}
        formContent={formContent}
        handleSubmit={e => handleSubmit(e)}
        handleTitleInput={e => setFormTitle(e.target.value)}
        handleContentInput={e => setFormContent(e.target.value)}
      />
    </View>
  )
}

// ...
实现“帖子详情”页面
在 src/pages 中创建 post 目录,然后在其中创建 post.jsx 和 post.scss,分别为页面模块和样式文件。post.jsx 代码如下:
import Taro, { useRouter } from '@tarojs/taro'
import { View } from '@tarojs/components'
import { PostCard } from '../../components'

import './post.scss'

export default function Post() {
  const router = useRouter()
  const { params } = router

  return (
    <View className="post">
      <PostCard title={params.title} content={params.content} />
    </View>
  )
}

Post.config = {
  navigationBarTitleText: '帖子详情',
}
注意到我们用了 useRouter 这个 Hook(Taro 专有),它用来在函数组件中获取 router,等同于之前类组件中的 this.$router。有了 router,我们就可以获取到在刚才 PostCard 组件跳转时传进来的 title 和 content 参数了。
post.scss 的代码如下:
.mine {
  margin: 30px;
  border: 1px solid #ddd;
  text-align: center;
  height: 90vh;
  padding-top: 40px;
  display: flex;
  flex-direction: column;
  align-items: center;
  justify-content: space-between;
}

.mine-avatar {
  width: 200px;
  height: 200px;
  border-radius: 50%;
}

.mine-nickName {
  font-size: 40;
  margin-top: 20px;
}

.mine-username {
  font-size: 32px;
  margin-top: 16px;
  color: #777;
}

.mine-footer {
  font-size: 28px;
  color: #777;
  margin-bottom: 20px;
}
实现“我的”页面
接着我们实现“我的”页面。创建 src/pages/mine 目录,在其中创建 mine.jsx 和 mine.scss。页面组件 mine.jsx 代码如下:
import Taro from '@tarojs/taro'
import { View, Image } from '@tarojs/components'

import './mine.scss'
import avatar from '../../images/avatar.png'

export default function Mine() {
  return (
    <View className="mine">
      <View>
        <Image src={avatar} className="mine-avatar" />
        <View className="mine-nickName">图雀酱</View>
        <View className="mine-username">tuture</View>
      </View>
      <View className="mine-footer">From 图雀社区 with Love ❤</View>
    </View>
  )
}

Mine.config = {
  navigationBarTitleText: '我的',
}
样式文件 mine.scss 代码如下:
.mine {
  margin: 30px;
  border: 1px solid #ddd;
  text-align: center;
  height: 90vh;
  padding-top: 40px;
  display: flex;
  flex-direction: column;
  align-items: center;
  justify-content: space-between;
}

.mine-avatar {
  width: 200px;
  height: 200px;
  border-radius: 50%;
}

.mine-nickName {
  font-size: 40;
  margin-top: 20px;
}

.mine-username {
  font-size: 32px;
  margin-top: 16px;
  color: #777;
}

.mine-footer {
  font-size: 28px;
  color: #777;
  margin-bottom: 20px;
}
查看效果
又到了激动人心的验收环节。我们应该能看到下面所示的效果:

加速开发,Taro UI 帮帮忙
在编写用户界面时,如果每次都要自己编写组件逻辑、调整组件样式,对于学习来说是完全可以的,但是对于实际开发任务就显得很麻烦了。在 React 社区,我们有诸如 Ant Design 这样的组件库,能够让我们快速搭建一套专业美观的界面。而 Taro 也提供了 Taro UI 组件库,为我们提供了能够适应多端的成熟组件。在这一步中,我们将用 Taro UI 升级界面,让它看上去更像一个成熟的小程序。
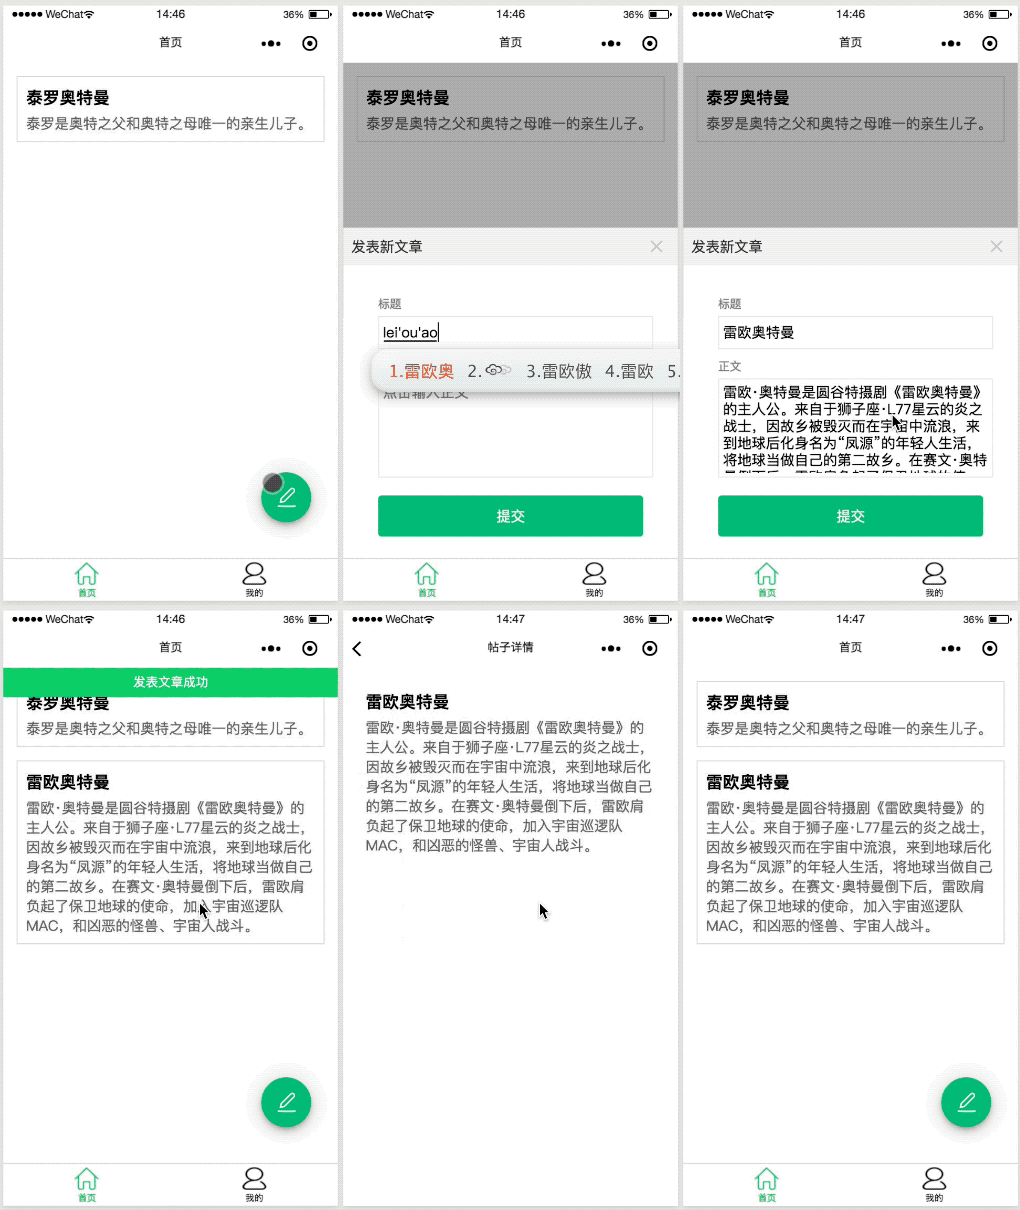
我们先贴出升级后的 demo 展示:

可以看到我们做了三点改进:
- 通过点击一个浮动按钮(Fab)来触发创建新文章的浮动弹层(FloatLayout)
- 发布成功后,会显示一条温馨的消息提示(Message)
- 帖子详情页面中 PostCard 组件去掉了边框,让它看上去更像正文展示
配置 Taro UI
首先安装 Taro UI 的 npm 包:
npm install taro-ui
为了后续能在 H5 中使用 taro-ui,我们需要在 config/index.js 中添加如下配置:
h5: {
  esnextModules: ['taro-ui']
}
升级 PostForm
首先让我们升级 PostForm 组件。我们先尝鲜 Taro UI 的 AtButton 组件,替换掉之前 Taro 自带的 Taro 组件:
import Taro from '@tarojs/taro'
import { View, Form, Input, Textarea, Button } from '@tarojs/components'
import { AtButton } from 'taro-ui'

import './index.scss'

export default function PostForm(props) {
  return (
    <View className="post-form">
      <Form onSubmit={props.handleSubmit}>
        <View>
          <View className="form-hint">标题</View>
          <Input
            className="input-title"
            type="text"
            placeholder="点击输入标题"
            value={props.formTitle}
            onInput={props.handleTitleInput}
          />
          <View className="form-hint">正文</View>
          <Textarea
            placeholder="点击输入正文"
            className="input-content"
            value={props.formContent}
            onInput={props.handleContentInput}
          />
          <AtButton formType="submit" type="primary">
            提交
          </AtButton>
        </View>
      </Form>
    </View>
  )
}
注意到我们还把之前 <View>添加新的帖子</View> 去掉了,因为接下来我们会把表单放在浮动弹层 FloatLayout 里面,所以就不需要这行提示啦。
提示
你也许会好奇为啥 Taro UI 的组件都以
At开头?一个是为了与普通的 Taro 组件区分,另一个则是因为开发 Taro 团队正是 Aotu.io 凹凸实验室。
调整 PostForm 组件的样式,代码如下:
.post-form {
  margin: 0 30px;
  padding: 30px;
}

.input-title {
  border: 1px solid #eee;
  padding: 10px;
  font-size: medium;
  width: 100%;
}

.input-content {
  border: 1px solid #eee;
  padding: 10px;
  width: 100%;
  height: 200px;
  font-size: medium;
  margin-bottom: 40px;
}

.form-hint {
  font-size: small;
  color: gray;
  margin-top: 20px;
  margin-bottom: 10px;
}
正如之前所说,我们打算把创建新帖子的表单放在浮动弹层 FloatLayout 中。在首页模块 src/pages/index/index.jsx 中导入相关组件,代码如下:
import Taro, { useState } from '@tarojs/taro'
import { View } from '@tarojs/components'
import { AtFab, AtFloatLayout, AtMessage } from 'taro-ui'

import { PostCard, PostForm } from '../../components'
import './index.scss'

export default function Index() {
  const [posts, setPosts] = useState([
    {
      title: '泰罗奥特曼',
      content: '泰罗是奥特之父和奥特之母唯一的亲生儿子。',
    },
  ])
  const [formTitle, setFormTitle] = useState('')
  const [formContent, setFormContent] = useState('')
  const [isOpened, setIsOpened] = useState(false)

  function handleSubmit(e) {
    e.preventDefault()

    const newPosts = posts.concat({ title: formTitle, content: formContent })
    setPosts(newPosts)
    setFormTitle('')
    setFormContent('')
    setIsOpened(false)

    Taro.atMessage({
      message: '发表文章成功',
      type: 'success',
    })
  }

  return (
    <View className="index">
      <AtMessage />
      {posts.map((post, index) => (
        <PostCard
          key={index}
          title={post.title}
          content={post.content}
          isList
        />
      ))}
      <AtFloatLayout
        isOpened={isOpened}
        title="发表新文章"
        onClose={() => setIsOpened(false)}
      >
        <PostForm
          formTitle={formTitle}
          formContent={formContent}
          handleSubmit={e => handleSubmit(e)}
          handleTitleInput={e => setFormTitle(e.target.value)}
          handleContentInput={e => setFormContent(e.target.value)}
        />
      </AtFloatLayout>
      <View className="post-button">
        <AtFab onClick={() => setIsOpened(true)}>
          <Text className="at-fab__icon at-icon at-icon-edit"></Text>
        </AtFab>
      </View>
    </View>
  )
}

Index.config = {
  navigationBarTitleText: '首页',
}
我们来逐一分析新添加的代码:
- 首先从
taro-ui导入所需的AtFab、AtFloatLayout和AtMessage组件 - 使用
useStateHook 创建新的状态isOpened(用于记录浮动弹层是否打开)和用于修改状态的setIsOpened - 在
handleSubmit中,用setIsOpened(false)关闭浮动弹层,并用Taro.atMessage弹出提示消息 - 在
returnJSX 代码时,添加<AtMessage />组件,并在之前的PostForm组件外层包裹AtFloatLayout组件,最后添加浮动按钮AtFab
在首页样式文件 src/pages/index/index.scss 中添加样式如下:
.post-button {
  position: fixed;
  right: 60px;
  bottom: 80px;
}
升级 PostCard
接着我们来调整 PostCard 在不同页面的样式。classnames 是最常用的 CSS 类组合库,可以让你用 JavaScript 表达式灵活地进行 CSS 类的组合。例如我们有三个 CSS 类 foo、bar 和 foo-bar,可以通过 classNames 函数进行条件式组合:
import classNames from 'classnames`;

classNames('foo', 'bar'); // => 'foo bar'
classNames('foo', { bar: true }); // => 'foo bar'
classNames({ 'foo-bar': true }); // => 'foo-bar'
classNames({ 'foo-bar': false }); // => ''
classNames({ foo: true }, { bar: true }); // => 'foo bar'
classNames({ foo: true, bar: true }); // => 'foo bar'
我们也新增加一个 CSS 类 postcard__isList,用于表示在帖子列表中的样式。修改 src/components/PostCard/index.jsx 代码如下:
import Taro from '@tarojs/taro'
import { View } from '@tarojs/components'
import classNames from 'classnames'

import './index.scss'

export default function PostCard(props) {
  const handleClick = () => {
    // ...
  }

  return (
    <View
      className={classNames('postcard', { postcard__isList: props.isList })}
      onClick={handleClick}
    >
      <View className="post-title">{props.title}</View>
      <View className="post-content">{props.content}</View>
    </View>
  )
}

PostCard.defaultProps = {
  isList: '',
}
修改 PostCard 组件的样式,代码如下:
.postcard {
  margin: 30px;
  padding: 20px;
}

.postcard__isList {
  border: 1px solid #ddd;
}

.post-title {
  font-weight: bolder;
  margin-bottom: 10px;
}

.post-content {
  font-size: medium;
  color: #666;
}
定制主题颜色
Taro UI 支持一定程度的主题定制,这里我们采用最简单却也十分有效的 SCSS 变量覆盖。我们创建 src/custom-theme.scss,代码如下:
/* Custom Theme */
$color-brand: #02b875;
$color-brand-light: #41ca98;
$color-brand-dark: #02935e;
可以看到,我们定义了三个 SCSS 变量 $color-brand、$color-brand-light 和 $color-brand-dark,覆盖了 Taro UI 的默认主题色。
提示
欲查看所有可以覆盖的 SCSS 变量,请参考 Taro UI 的默认样式文件。如果不熟悉 SCSS 变量,这份指南是不错的资料。
紧接着我们需要在项目的全局样式文件 src/app.scss 中导入自定义颜色主题文件,代码如下:
@import './custom-theme.scss';

@import '~taro-ui/dist/style/components/button.scss';
@import '~taro-ui/dist/style/components/fab.scss';
@import '~taro-ui/dist/style/components/icon.scss';
@import '~taro-ui/dist/style/components/float-layout.scss';
@import '~taro-ui/dist/style/components/textarea.scss';
@import '~taro-ui/dist/style/components/message.scss';
@import '~taro-ui/dist/style/components/avatar.scss';
可以看到,除了导入了刚刚创建的 custom-theme.scss,我们还按需引入了 Taro UI 中所用到组件的样式,这样可以有效减少打包后应用体积的大小哦。
完成这一步的代码后,记得在模拟器里面看看运行起来是不是跟开头的 GIF demo 效果完全一致哦!
至此,《Taro 多端小程序开发大型实战》第二篇也就结束啦。欢迎继续阅读第三篇,我们将手把手带大家用实现如何在 Taro 框架下实现多端登录(微信小程序 + 支付宝小程序 + 普通登录)。
想要学习更多精彩的实战技术教程?来图雀社区逛逛吧。
本文所涉及的源代码都放在了 Github 上,如果您觉得我们写得还不错,希望您能给❤️这篇文章点赞+Github仓库加星❤️哦~

